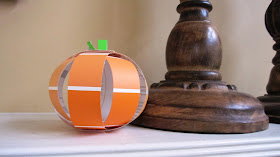
I have a fun fall craft for your today! And the best part, it's totally FREE!!!! Yes, free fall decor. Awesome.
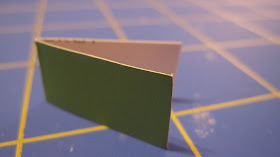
A little bit ago, the hub and I were at Home Depot looking for a part to fix a drawer. I wasn't all that interested, so I meandered over to the paint chips. I've always loved seeing so many different colors and reading the fantastic names they come up with! (One of my favorites was "cranberry zing.") I grabbed a particularly vibrant orange and read the name...
I was practically floored. Of course!! A paint chip pumpkin patch! I grabbed several of them so I could go home and make....
A paint chip pumpkin! I've seen tons of paper pumpkins on the internet, and with vibrant colors and stiffer paper, I thought paint chips would work perfectly! A simple and FREE craft!
Want to make some of your own? (Trust me, you're going to make "some!")
You will need:
- Orange and green paint chips (FREE from Home Depot!)
- Glue gun (or stapler, brads, tacky glue, whatever you have will work!)
- Ruler
- Scissors
- Pencil
The first thing you'll need to do is cut your samples into 1-inch wide stripes. I used 8 per pumpkin. You don't have to spell out your name with them, I was just having fun. :)
This next part is the trickiest of the entire project. Since the paint chips are so much stiffer than regular paper, they need a little help curving. Hold each end of the strip, and pull it tightly against the edge of a table. (In the picture I'm not pulling very tightly, it was just to show the technique.) Pull it back and forth against the edge of the table several times (ok, like 30-40 times, but it only takes a few seconds!) until the strip has a little bit of curve to it.
This is what you'll end up with. See how they're nice and curved by themselves?
Now to assemble the pumpkin! Make sure that glue gun is on! Take two strips and line them up perpendicularly. (You know, create a right angle using the two strips?) Dab a little bit of glue on them and stick them together.
To make everything line up nicely, it's helpful to always work with the side perpendicular to the one you just finished, not the one opposite of it. Glue the next one down...
And the next one to get a cross shape. Once you have that, you need to attach the tops together.
Working one at a time, glue each one together, still working with perpendicular strips.
Tadah!!! You can leave it like this if you want, but I didn't want to see the bar codes and writing on the inside, so I added some more strips.
I just added strips to the open sides of the pumpkin and glued them to the top. With the basic shape already done, this will be much easier.
Huzzah! We almost have a pumpkin!
I added a green star to it, and then realized that I'm making a pumpkin, not a tomato. Stupid me! Don't add a star!
You do need to add a stem though. Cut a small rectangle out of the green paint chip (I'm talking a centimeter wide and an inch tall!) Fold it in half.
Fold the two ends under, making a triangle shape. This just gives the glue something to stick to.
Cut a thinner, longer strip of green and coil it around a pencil to get a spring like shape.
Glue them both on and you're done! Make several more so your first pumpkin isn't lonely.
Admire your new, FREE, fall decor! I have several more in the works with other colors and different styles of chips, so stay tuned for my own pumpkin patch!
Seriously my friends, these are SO much fun!!
I experimented with different shades of orange.
A tiny, "spooky" pumpkin.
"Buttered sweet corn" on "Cinderella's dress." Aren't those the coolest paint names?
This one was fun, I cut up two different reddish chips and arranged them all in order from darkest to lightest (the lighting doesn't look right in the picture.)
It came out to this. It's one of my favorites, I wish I could show you how cool it is in pictures!
My little pumpkin patch. They're now scattered all over my bookshelf! I love them, I smile when I look at them.
Happy crafting! Stop by and say hi sometime!
Cut a thinner, longer strip of green and coil it around a pencil to get a spring like shape.
Glue them both on and you're done! Make several more so your first pumpkin isn't lonely.
Seriously my friends, these are SO much fun!!
I experimented with different shades of orange.
A tiny, "spooky" pumpkin.
"Buttered sweet corn" on "Cinderella's dress." Aren't those the coolest paint names?
This one was fun, I cut up two different reddish chips and arranged them all in order from darkest to lightest (the lighting doesn't look right in the picture.)
It came out to this. It's one of my favorites, I wish I could show you how cool it is in pictures!
My little pumpkin patch. They're now scattered all over my bookshelf! I love them, I smile when I look at them.
Happy crafting! Stop by and say hi sometime!
.................................................................................................
Thanks Amie! Those are really cute! Make sure to go & visit her blog :)


This is such a cute project, I just may have to make one (: Found you through Follow Me Fridays.
ReplyDeleteHi there, I found ya via blog hop and had to stop in and say hello, LOVE all your creativity and space here.. Excited to get to share in more blog fun reads and inspiration from ya.. I'm officially following ya.. I'm Marilyn via http://theartsygirlconnection.blogspot.com/ - hope you can stop in & link this awesome craft in my fall crawl blog hop happening now :)) TY
ReplyDelete